
When your 2017 Ford Explorer fills the cabin with a smell like a grease fire every time you turn on the heat, it's easy to assume the worst. Most people jump straight to an exhaust manifold gasket, a turbo issue, or some other expensive repair.
This problem can look much bigger than it is. In this case, the smoke and smell came from a tiny failed seal at the VCT solenoid, a part small enough to overlook and cheap enough to replace before the leak turns your SUV into a driveway mess.
If your 3.5L EcoBoost smokes only when the heater is on, start here.
https://www.youtube.com/watch?v=3DpTUFhMM4o
When heater smoke points to an oil leak, not an exhaust leak
Cabin smoke on a cold morning gets your attention fast. You turn on the heat, and within minutes the inside of the vehicle smells like burning oil. Sometimes it even looks like smoke is rising from under the hood, which makes the whole thing feel a lot worse.
That symptom often sends people toward the wrong repair. A leaking exhaust manifold gasket seems like the obvious answer because the smell comes in through the HVAC system. But on the 3.5L EcoBoost, oil leaking onto a hot exhaust manifold can create the same result.
The signs in this case were pretty clear once the inspection started:
- Smoke or strong burnt-oil smell when the heater is on
- Oil splatter on the passenger-side wheel well area
- An intermittent misfire showing up during a scan
That last symptom matters, but not in the way you might think. A misfire can point you toward a maintenance problem, especially if oil gets into the spark plug wells. Still, an intermittent cylinder 3 misfire does not explain smoke pouring into the cabin.
If the smoke shows up with the heat on, look for an oil leak above the exhaust before blaming the exhaust itself.
That small change in thinking can save a lot of time. It also keeps you from throwing parts at the wrong side of the problem.
Start with codes before chasing the leak
The first move was simple, and it was the right one. Plug in a scanner and check for engine codes before taking anything apart. Any time an engine runs rough, smells strange, or acts up under load, a scan gives you a starting point.
What the scanner showed
A scan with the Thinkcar Thinkscan Diagnostic Tool showed only one issue, an intermittent misfire on cylinder 3. That matters because it narrows the search. There was no code pointing to a failed turbo, no code suggesting a major engine fault, and nothing that directly explained smoke from the heater vents.

A basic scan doesn't solve every problem, but it helps you rule things out. That's a better use of time than guessing.
Why the misfire didn't explain the smoke
A misfire can cause rough running, a flashing check engine light, and poor performance. It doesn't normally spray oil onto the exhaust manifold. So even though cylinder 3 needed attention, it wasn't the source of the smoke entering the cabin.
That matters because it shifts the inspection back to the passenger side of the engine bay. Once oil splatter showed up there, the trail got a lot easier to follow.
If you want a better sense of what a higher-feature scan tool can do beyond basic code reading, a hands-on ThinkScan review shows the kind of access these tools can provide on multiple systems. For this repair, though, the key benefit was simple: it ruled out a bigger problem and kept the diagnosis moving.
The hidden leak that turns a 1 mm gap into a smoke machine
Oil leaks don't always drip straight to the ground. Some of the worst ones spray, spread, and burn off before you ever see a puddle. That's exactly what happened here.
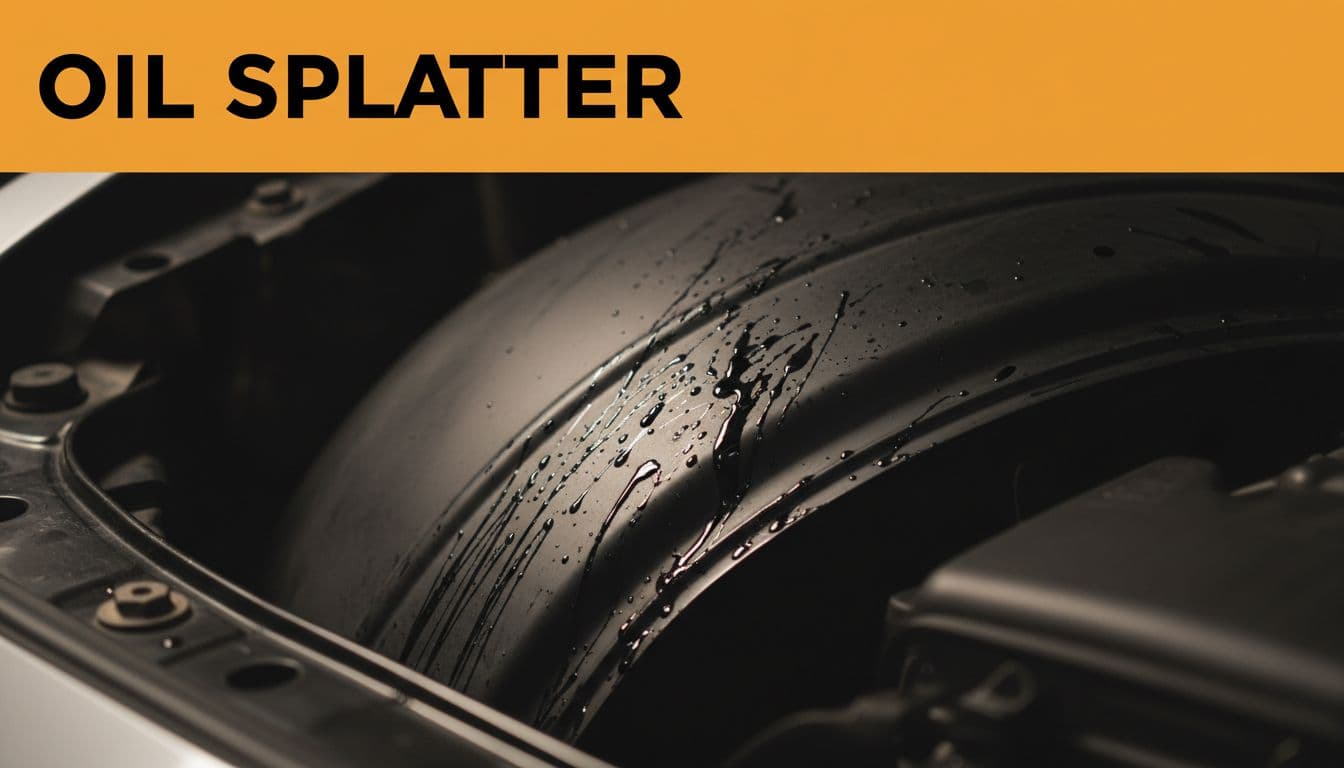
Oil splatter on the wheel well was the first real clue
At first glance, the leak looked like it might be coming from the valve cover gasket. That would make sense because valve cover leaks are common, especially if the cover wasn't torqued evenly or the gasket has aged out.
But the passenger-side wheel well area had oil splattered on it, not just dampness around the cover edge. That kind of pattern suggests pressure, not a lazy seep.
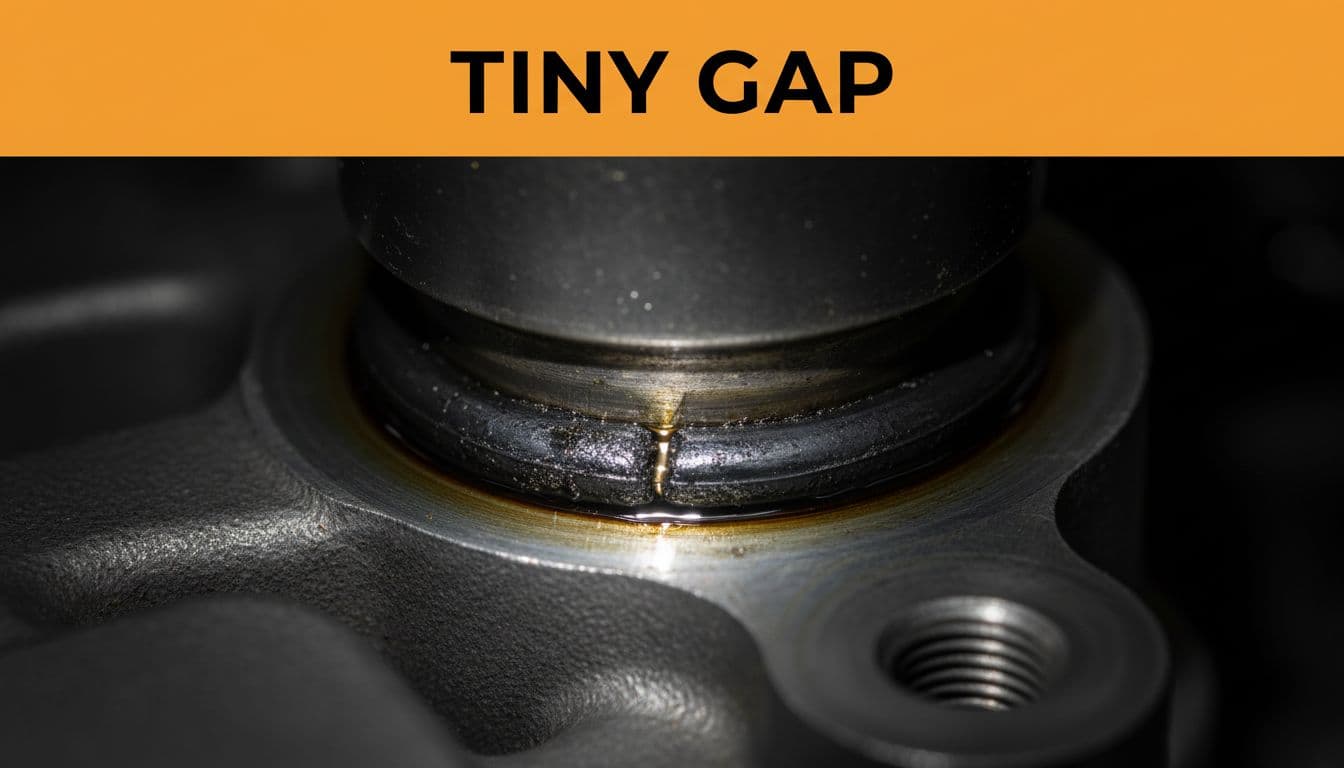
Once the inspection moved closer to the base of the VCT sensor, the real issue showed itself.
The VCT solenoid gasket was the real culprit
At the base of the VCT solenoid, there was a visible gap. The gasket had hardened with age and heat until it was basically rock-hard. When it failed, it left about a 1 mm gap.
That sounds tiny. Under turbo pressure, it isn't.
Instead of a small seep, that opening can act like a fire hose. Oil sprays out, hits the hot exhaust manifold below, and the HVAC system pulls the fumes straight into the cabin. That's why the smell gets worse when the heater is on.
This failure is easy to miss because the leak source is so small. The effect, however, is anything but small. On Ford's valve cover service procedure, the VCT solenoid seals are called out for inspection during valve cover work, and the sealing surfaces matter a lot. The Ford Explorer valve cover removal and installation guide also warns against scratching the sealing area while cleaning.
Other 3.5L EcoBoost owners have reported similar seep and spray problems around these seals, which lines up with what showed up here in real life. A good example is this F-150 EcoBoost forum discussion about leaking VCT seals.
Why plastic valve covers become part of the problem
Once the leak was found, there was another decision to make. Replace the gasket and reuse the old covers, or upgrade the covers while everything was apart.
On this engine, the choice was to upgrade from plastic valve covers to black aluminum valve covers. That wasn't done for looks. It was done because plastic covers get brittle with heat and age, and brittle parts crack.
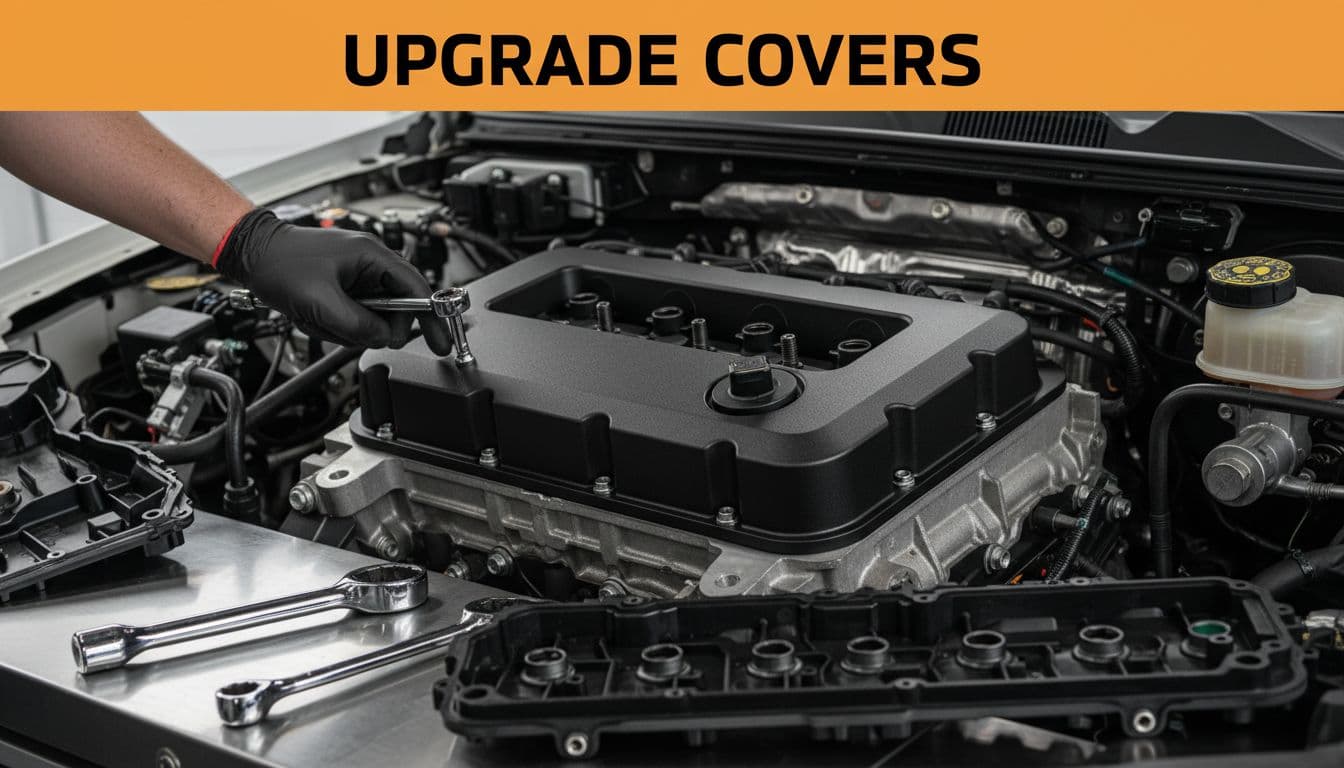
The upgrade also makes the next repair less stressful. If you've ever tried to reinstall a plastic cover while worrying about cracking it, you already know why aluminum sounds better.
This side-by-side view shows the logic behind the switch:
| Valve cover type | What to expect |
|---|---|
| Plastic | Can become brittle with heat and age, easier to crack if over-torqued |
| Aluminum | More durable, better long-term choice for repeated service |
If you're considering the same route, the video points to an aluminum valve cover upgrade that fits the repair path shown here.
Even if you keep the plastic covers, the takeaway stays the same. You need to treat them gently on reassembly, because over-tightening them is an expensive mistake.
Installing the gasket set the right way
The fix itself wasn't complicated, but it did require care. A rushed install can leave you with the same oil leak, a new misfire, or a cracked cover.
Clean the sealing surface until it's spotless
The first rule was simple: the surface had to be surgical. Any leftover gasket material, oil film, or debris can stop the new gasket from seating flat. If that happens, the repair won't last.
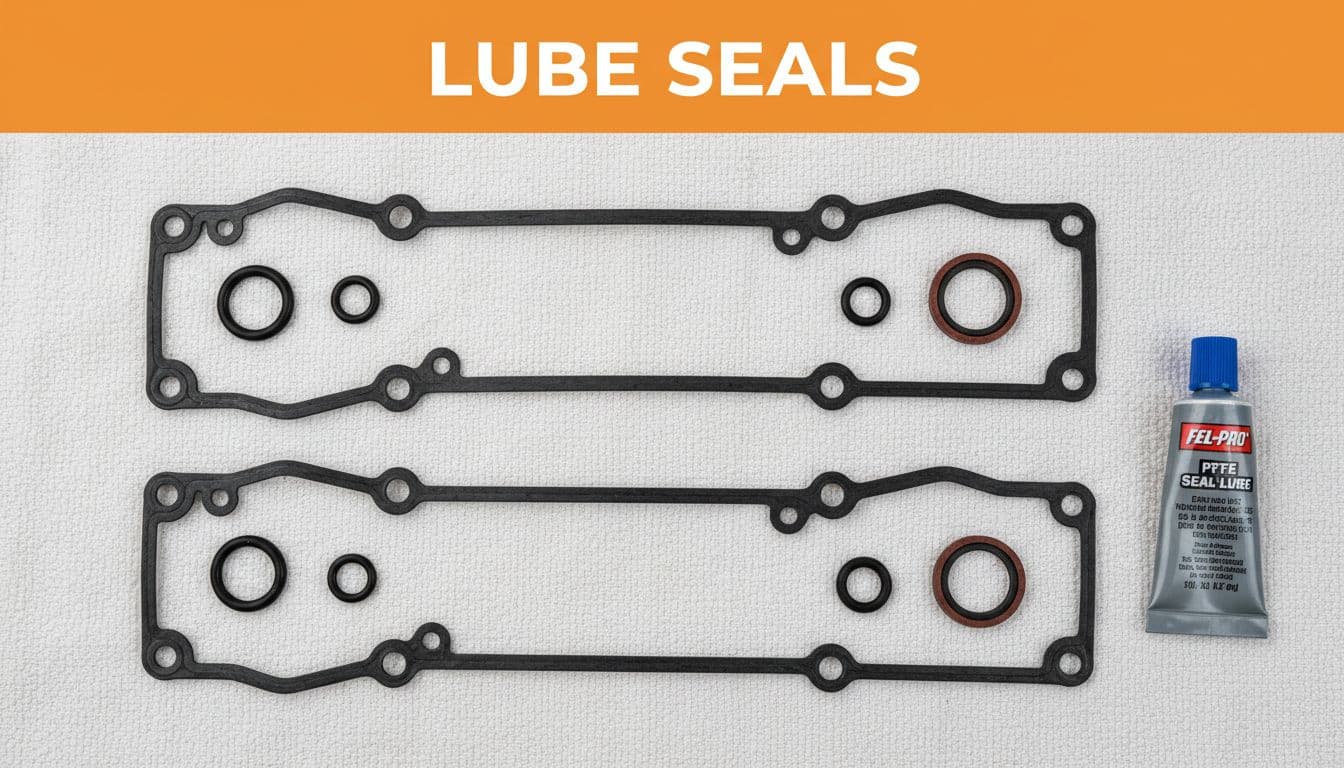
Fel-Pro's own 3.5L EcoBoost valve cover gasket guidance stresses how complete these kits are and why it makes sense to replace the related seals while you're already in there. The Fel-Pro valve cover gasket set used here includes the seals you want to inspect, not only the main cover gaskets.
Replace the O-rings, and lube them before install
This step is where a lot of repeat leaks begin. When replacing the valve cover gasket, the spark plug well O-rings and the sensor O-rings need attention too. They are in the kit for a reason.
If a spark plug tube seal fails, oil can fill the plug well and soak the ignition coil. That can easily set up the kind of intermittent misfire seen on cylinder 3.
Before installation, the O-rings and seals were lubed with oil or an oil-based lubricant. That helps them slide into place without twisting, rolling, or sitting at an angle.
A clean install looks like this:
- Lightly lube the spark plug and sensor O-rings.
- Seat each seal fully and make sure it sits flush.
- Recheck for any rolled edge before the cover goes on.
That small bit of prep can keep you from redoing the whole job next weekend.
The torque spec that matters most
Reassembly is where people break things. Plastic valve covers on this setup can crack if they are tightened past 89 inch-pounds.
That spec is inch-pounds, not foot-pounds. Use the right torque wrench. Don't grab the big one and guess.
Fel-Pro also notes in its valve cover gasket installation guide that following the manufacturer's torque specs and tightening sequence matters. If there isn't a listed pattern for your application, work from the center outward and alternate fasteners evenly.
A gasket job is cheap. A cracked valve cover turns it into a different repair.
What changed after the repair
After the new gaskets and seals were installed, the result was immediate. There was zero smoke, zero smell, and no more headache from oil fumes when the heat was on.
That is the kind of repair that changes how the whole vehicle feels. Before the fix, the Explorer felt like it was one problem away from becoming a "mechanic special" on Facebook Marketplace. Afterward, it was back to acting like a normal driver.
The price matters too. A roughly $40 gasket fix is a lot easier to swallow than chasing the wrong repair or paying shop labor to diagnose a leak that only shows up under pressure.
More importantly, this was a reminder that tiny failures can create big symptoms on a turbo engine. The leak source was smaller than a penny, but the mess it made filled the cabin.
Parts and tools mentioned in this repair
If you're tackling the same issue, these are the parts and tools referenced in the video and description:
- Fel-Pro valve cover gasket set
- Aluminum valve cover upgrade
- Thinkcar Thinkscan diagnostic tool
- Sell Those Flipping Cars store
The channel also teased more 3.5L EcoBoost repairs and a Thinkcar tool review, which fits the kind of ongoing maintenance these engines often need as they age. If you wrench on your own vehicles, that kind of model-specific coverage saves time because the same weak spots tend to show up again.
Final thoughts
A burning-oil smell in the cabin can feel like a major engine problem, but this repair shows how often the real cause is a small seal failure in the wrong place. On the 3.5L EcoBoost, a hardened VCT solenoid gasket can spray oil onto the exhaust manifold and send fumes straight through the HVAC system.
The best takeaway is simple. Scan first, inspect for oil spray, and don't ignore the related seals while the valve cover is off.
When a 1 mm gap can create that much smoke, careful diagnosis matters more than expensive guesses.